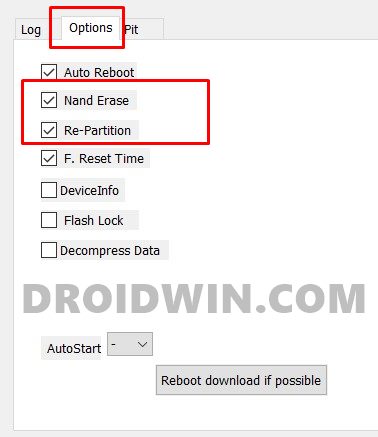
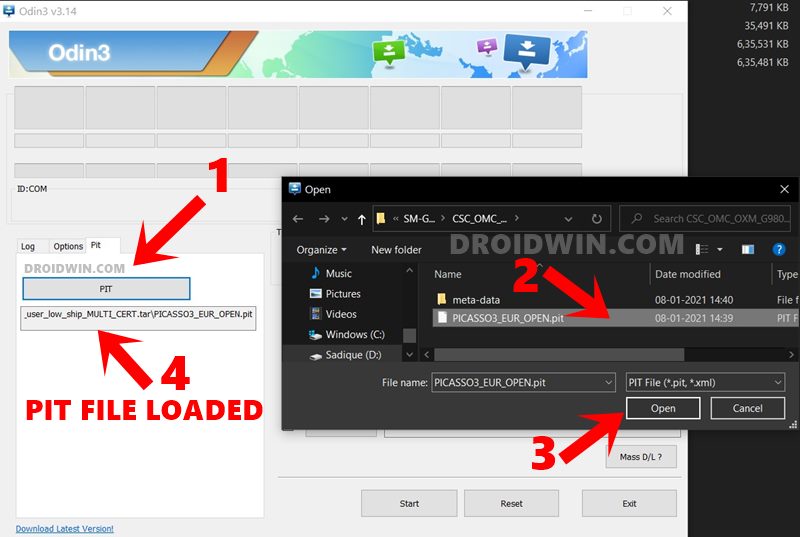
These include the likes of boot partition (where we flash stock boot.img or boot the twrp via fastboot boot twrp.img), the recovery partition (where we flash the TWRP via fastboot flash recovery twrp.img), the data partition (that stores all the data on your device), the EFS Partition (that stores your all-important IMEI number), the system partition (that holds the Android OS, in system.img format), the cache partition (for storing temporary data) among others. [Recovery and Cache Partition no longer exists in A/B Partition devices]. So if anything happens to your device, you could easily restore this backup and your device shall be up and running in no time. With that said, in some instances, you would have to wipe off all the partitions on your device. In other words, you will have to NAND Erase your device. When you do so, all the data in the aforementioned partitions will be wiped off. To re-setup your device, you will have to flash the stock firmware onto your device. But the regular flashing of firmware wouldn’t do any good. You will have to flash the Partition Information Table or PIT file alongside the firmware. For the unaware, a PIT file holds all the important information relating to the partitions present on your device, how much block size does each partition needs to have, among others. So you will have to load this file to Odin so that the Tool is able to read and identify all the partition files accordingly. Once that is done, it will then be able to flash the BL, CP, AP, CSC files without any issue. So without further ado, let’s check out the detailed instructions to NAND Erase and Re-Partition your Samsung device via Odin.
How to Install Android 11 (OneUI 3.0) on any Samsung Phone via OdinDowngrade Samsung from Android 11 to Android 10 (OneUI 3.0 to 2.0/2.5)How to Root any Samsung device via Magisk and OdinGuide to Patch Samsung AP Firmware via Magisk
How to Nand Erase and Re-Partition Samsung via Odin
The below instructions are listed in separate sections for ease of understanding. Make sure to follow in the exact same sequence as mentioned below. Furthermore, the process will wipe off all the data from your device. So take a backup beforehand. Droidwin and its members wouldn’t be held responsible in case of a thermonuclear war, your alarm doesn’t wake you up, or if anything happens to your device and data by performing the below steps.
STEP 1: Download Samsung Stock Firmware via Frija
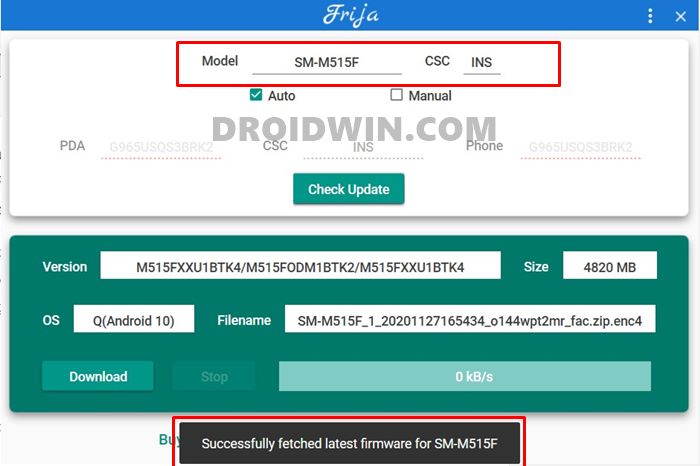
First and foremost, you will have to download your device’s stock firmware. For that, there are a variety of options including the SamMobile website and a couple of other tools. Here at Droidwin, we use the Frija Tool. So if you also echo this thought, then please refer to our detailed guide on How to Download Samsung Stock Firmware/ROM via Frija Tool.
STEP 2: Get Samsung PIT File
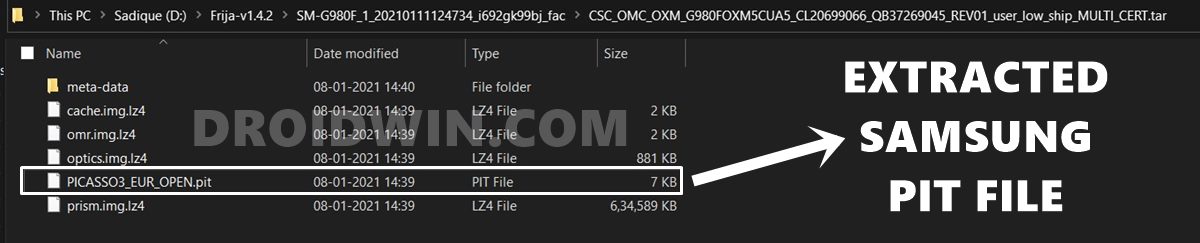
Now that you have downloaded the firmware file, you will need to get a hold of the PIT file. For that, you may refer to our comprehensive guide on How to Extract PIT Files from Samsung Firmware. Shorter Instructions: Extract the CSC file from the stock firmware and you shall get the PIT file. When that is done, move to the next step to NAND Erase and Re-Partition your Samsung device via Odin.
STEP 3: Boot Samsung Device to Recovery
You will now have to boot your device to the Recovery Mode. You may use your device-specific hardware key combinations or the adb reboot recovery command for that. All of this is mentioned below, follow along. Now that your device is booted to Recovery Mode proceed to the next step of this guide to NAND Erase and Re-Partition your Samsung device via Odin.
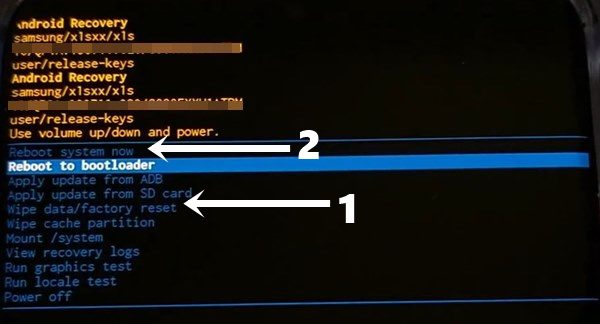
STEP 4: Wipe Data on Samsung via Stock Recovery
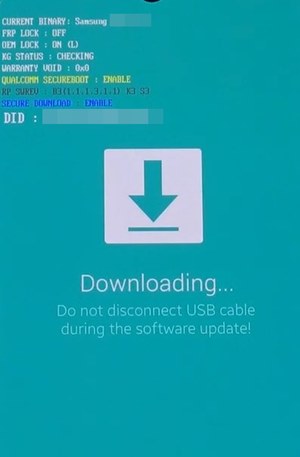
STEP 5: Boot Samsung Device to Download Mode
You will now have to boot your device to Download Mode so that Odin is able to identify it and is able to carry out the NAND Erase and Re-Partition process on your Samsung device. So refer to our guide on How to Boot any Samsung Device to Download Mode. If you don’t wish to check out that detailed guide, then here are the shorter instructions in a tabular form.
Once your device is booted to Download Mode, connect it to the PC via USB cable and proceed to the below instructions to perform a NAND Erase and Re-partition on your Samsung device via Odin.
New Method to Boot to Recovery Mode on Samsung OneUI 3.0 Android 11How to Stop Samsung Find My Device Offline Finding NotificationsSteps to Create Samsung Combination Firmware and Flash it via OdinHow to Boot Rooted Samsung to Recovery Mode and Rooted OS
STEP 6: Perform NAND Erase and Re-Partition Samsung via Odin
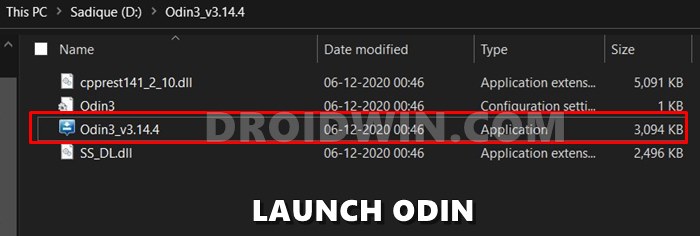
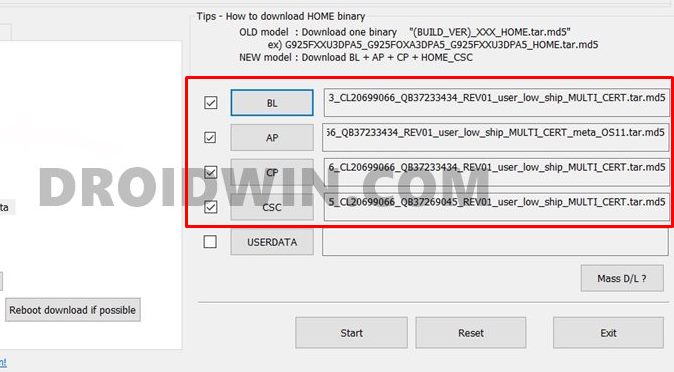
To begin with, make sure that you have extracted the Samsung firmware files. Doing so shall give you the BL, CP, AP, CSC, and Home CSC files. So you will now have to load these files (except Home CSC) to Odin. Along the same lines, you should have also extracted the CSC file and got the PIT file (as explained in STEP 2). Likewise, your device shall be booted to Download Mode and connected to PC via USB as well. If that’s all well and good, then proceed with the below instructions That’s it. With this, we conclude the guide on how to NAND Erase and Re-Partition any Samsung device via Odin. If you have any queries concerning the aforementioned steps, do let us know in the comments. We will get back to you with a solution at the earliest.
How to Pass SafetyNet test after installing Xposed or EdXposedHow to Pass Magisk SafetyNet on Rooted Android 11Fix No WiFi, Calls, Network after Root or Custom ROMHow to Fix ctsProfile Mismatch Error on Rooted Android
About Chief Editor